
Wednesday, June 13, 2012
No desserts...take 2? or 3? Not real sure!
So Kelly decided to do a 10 day cleanse, so I thought what better time to try and hit my goal of 30 days without candy, cookies, cake, pie or ice cream (or other "desserts"). So as of now I am on day 10. Kelly is off her cleanse today, so she wants to make cookies...this is going to be tough...but it has been 10 days, so I am a 3rd of the way done. I can do it!! WILL POWER, WILL POWER, WILL POWER!! I did not say "no sugar at all" because I know that is TOTALLY unrealistic. So I still have drank juice, chocolate milk, coffee with flavored creamers and even have had choc. covered granola bars. I am just having to avoid grabbing the basket of candy off the fridge or giving into making the delicious looking desserts I have pinned on pinterest...in 20 days I may over indulge?! I sure hope not, maybe this will help me control my AWFUL, AWFUL sweet tooth I seem to have been born with!!

Wednesday, June 6, 2012
#89-3 new recipes
So I do a lot of "pinning" :) and with that comes some YUMMY looking recipe ideas...so here are a few I have made of late!


First up...Bacon Wrapped Green Beans
(picture was after they were cooked...sorry)

Green Bean Bacon Bundles from the blog How Sweet It Is
1 pound fresh green beans
10-12 slices of thick-cut bacon *I used regular bacon
2 tablespoons butter
1 tablespoon brown sugar
2 cloves of garlic, minced
1/4 teaspoon salt
1/4 teaspoon pepper
Preheat oven to 400 degrees F. Spray a 9 x 13 baking dish with non-stick spray.
Wash and thoroughly dry green beans, then season with salt and pepper. Bundle together about 5-8 green beans – this will depend on your size of beans and the amount of beans you get for one pound. Bundle together as many as you’d like! Using a slice of bacon, wrap it around the center of the beans to hold it together. Lay the bundle bacon seam side down in the baking dish to hold it together. Repeat with remaining beans.
1 pound fresh green beans
10-12 slices of thick-cut bacon *I used regular bacon
2 tablespoons butter
1 tablespoon brown sugar
2 cloves of garlic, minced
1/4 teaspoon salt
1/4 teaspoon pepper
Preheat oven to 400 degrees F. Spray a 9 x 13 baking dish with non-stick spray.
Wash and thoroughly dry green beans, then season with salt and pepper. Bundle together about 5-8 green beans – this will depend on your size of beans and the amount of beans you get for one pound. Bundle together as many as you’d like! Using a slice of bacon, wrap it around the center of the beans to hold it together. Lay the bundle bacon seam side down in the baking dish to hold it together. Repeat with remaining beans.
Heat a small saucepan over low heat. Add butter, brown sugar and garlic and whisk until melted and combined. Using a pastry brush, brush the mixture over top of each green bean bundle. Cover the bundles with foil and bake for 35 minutes. Remove foil and bake for 10-15
**I didn't like how the fresh green beans looked at the store, and I had some frozen ones in the freezer, so I used those instead. They still turned out DELICIOUS! I will def. makes these again! I wish I would have made more to start with because they ALL got eaten and I only got to have one when really I wanted like 5!! :)
**Also I don't have a pastry brush, so I just poured the brown sugar mixture over the top..I also forgot to cover them w/ foil and cooked them for 45 minutes and they still turned out SOO, SOO YUMMY!
Next up: Man Pleasing Chicken
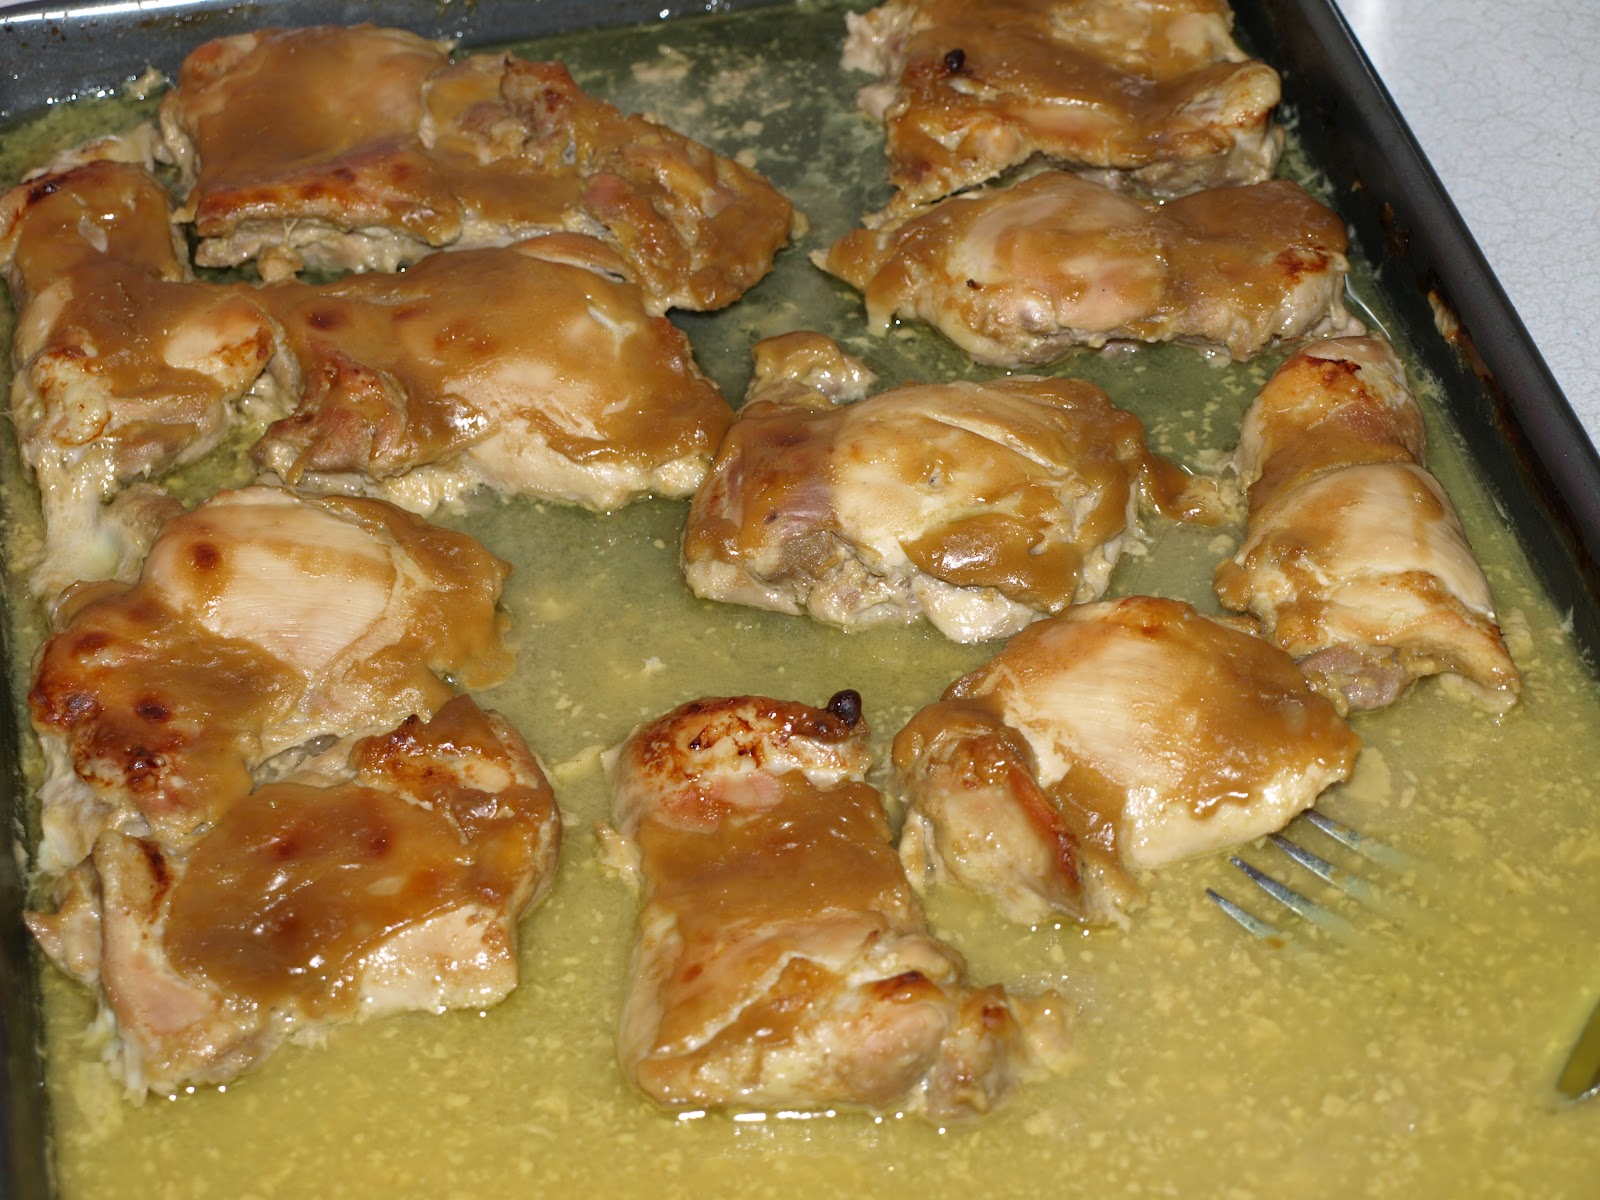
(both of my 9x13 pans were in use so I used a cookie sheet...it worked fine.)
**Again another recipe I would make again... soo yummy and soo easy!!
preheat your oven to 450ºF. Then, mix together 1/2 cup of dijon mustard, 1/4 cup of maple syrup, and 1 tablespoon of rice wine vinegar.
Put a 1.5 pound package of chicken thighs into a foil-lined, oven-proof baking dish. I used boneless, skinless thighs. 4 came in my package and I was serving 10 people so I actually ended up cooking 18 pieces of chicken...I kind of forget, this was last week, but I doubled my sauce recipe so I would have enough... Then, salt and pepper the thighs. Pour your maple mustard mixture over them, turning the thighs in the mixture so they are fully coated.
Put the chicken thighs into the oven, and let them bake for 40 minutes or until a meat thermometer reads 165ºF. Baste the tops of the chicken with more sauce half way through. **note from original recipeI find that a meat thermometer is essential in cooking because it allows me to check for doneness without cutting into the meat and losing its precious juices.** (I went out and bought one and boy was I glad...the chicken was so moist and juicy and I knew when it was done! Let the chicken rest for 5 minutes before serving. Plate the chicken, making sure to spoon some extra sauce over the top. Sprinkle over some fresh rosemary.
The dinner plate for the evening...

I paired the chicken and green beans w/ garlic mashed potatoes and a salad.
DELICIOUS!
Now dessert...this was an EPIC FAIL!!!!!!!!
Rootbeer Float Cupcakes
Cake Ingredients
1 cup root beer schnapps
1 1/2 cups old-fashioned style root beer (like A&W or Dads)
2 tsp. vanilla extract
2 cups dark brown sugar
1 cup butter
2 eggs
3 cups all purpose flour
1 Tbs. baking powder
2 tsp. baking soda
1 tsp. salt
1 1/2 cups old-fashioned style root beer (like A&W or Dads)
2 tsp. vanilla extract
2 cups dark brown sugar
1 cup butter
2 eggs
3 cups all purpose flour
1 Tbs. baking powder
2 tsp. baking soda
1 tsp. salt
Root Beer Glaze
4 cups confectioners sugar
1/3 cup root beer
3 Tbs. root beer schnapps*
3 Tbs. vegetable oil
1/3 cup root beer
3 Tbs. root beer schnapps*
3 Tbs. vegetable oil
*for a more kid friendly version, replace schnapps with more root beer
You will also need some extra root beer schnapps (1 Tbs. per cupcake)
Or for the kiddies use root beer (again 1 Tbs. per cupcake)
You will also need some basic Vanilla buttercream ( there are many recipes online to try J)
Or for the kiddies use root beer (again 1 Tbs. per cupcake)
You will also need some basic Vanilla buttercream ( there are many recipes online to try J)
Directions
1. Preheat oven to 350ºF.
2. In a bowl, mix together root beer schnapps, root beer, and vanilla extract. Set aside.
3. In a separate bowl, cream together butter and sugar until light and fluffy.
4. Add eggs, mix until smooth
5. Sift in flour, baking soda, baking powder and salt.
6. Mix with hand mixer on low, while slowly pouring in root beer mixture.
7. Mix until smooth and lump free.
8. Pour into lined cupcake pan. (Use foil cupcake liners to avoid "leakage" later.) Fill nearly to the top, you may think its over-filled, but it puffs up perfectly this way. Don't be tempted to use more than 24 cupcake cups... trust me.
9. Bake for 15- 20 minutes, until golden brown and cake springs back when touched.
10. While cupcakes are baking, prepare your butter cream and root beer glaze. For glaze, put all ingredients into a bowl and mix with a wisk until smooth and lump free.
11. To assemble, start by letting cupcakes cool, still in the pan.
12. While still slightly warm, pour 1 Tbs. of root beer schnapps over each cupcake. Pour on slowly to allow schnapps ( or regular root beer for the kiddies) to soak in.
13. Once the schnapps has soaked in and let sit for a few minutes, pour a couple tablespoons of glaze over each cupcake.
14. When the glaze sets up a bit and isn't too runny, put a "scoop" of buttercream atop each. For an added touch, you can even place a root beer barrel candy on each one.
2. In a bowl, mix together root beer schnapps, root beer, and vanilla extract. Set aside.
3. In a separate bowl, cream together butter and sugar until light and fluffy.
4. Add eggs, mix until smooth
5. Sift in flour, baking soda, baking powder and salt.
6. Mix with hand mixer on low, while slowly pouring in root beer mixture.
7. Mix until smooth and lump free.
8. Pour into lined cupcake pan. (Use foil cupcake liners to avoid "leakage" later.) Fill nearly to the top, you may think its over-filled, but it puffs up perfectly this way. Don't be tempted to use more than 24 cupcake cups... trust me.
9. Bake for 15- 20 minutes, until golden brown and cake springs back when touched.
10. While cupcakes are baking, prepare your butter cream and root beer glaze. For glaze, put all ingredients into a bowl and mix with a wisk until smooth and lump free.
11. To assemble, start by letting cupcakes cool, still in the pan.
12. While still slightly warm, pour 1 Tbs. of root beer schnapps over each cupcake. Pour on slowly to allow schnapps ( or regular root beer for the kiddies) to soak in.
13. Once the schnapps has soaked in and let sit for a few minutes, pour a couple tablespoons of glaze over each cupcake.
14. When the glaze sets up a bit and isn't too runny, put a "scoop" of buttercream atop each. For an added touch, you can even place a root beer barrel candy on each one.
Makes 2 dozen cupcakes
So I was super excited about making these and I knew Brynn would be eating them plus I didn't make it to the liquor store so I skipped the schnapps and used more rootbeer...which if I ever, key word IF, make these again i will def. get the schnapps...
Ingredients going into the bowl...

First round in the oven (to the top as recommended) pouring out EVERYWHERE...what a mess!

This does not look right!!!

Light and springy?!?! FAR FROM IT! They sunk and looked TERRIBLE!!!

As crappy as they looked I still tried to finish them off...by the time I made my buttercream I was not into making them presentable so I just slapped on a small scoop and called it good.


Complete FAILURE!
They were very mushy on the inside (and I didn't even add the extra rootbeer after baked...just the glaze) and getting burned on the outside so I had to take them out of the oven. They sunk terribly!!! And the rootbeer flavor wasn't that great. The best part was eating the buttercream frosting off the top...and there wasn't even much of that!

According to the original recipe this is what they are supposed to look like...hmmm..I would like to see this done...
Monday, June 4, 2012
#13
Okay so last week I began my journey of working out again...last week consisted of 2 days at the gym and 2 days of running. Yesterday we went on an hour walk to begin this week...so 7 weeks to go, working out at least 4 days a week!
recipe
Apparently I forgot to take a pic of these...but they were pretty delicious. This is def. a recipe I will try again!!!
Ranch House Crock Pot Pork Chops
Recipe from: Picky Palate
4-6 boneless Pork Chops, 1/2 inch thick
2 (10 ounce) cans Cream of Chicken soup
1 packet Ranch seasoning mix
Dried Parsley for sprinkling (optional)
DIRECTIONS: Place pork chops in the bottom of crock pot. Pour the soups over the chops and then sprinkle with ranch seasoning packet. Close the lid and cook on low for 6 hours, or on high for 4 hours. Serve each pork chop with the gravy from the crock pot, a sprinkle of dried parsely and some mashed potatoes!
#18 take 2!
Well Mother's day pudding pie ruined my 7 day stretch I had going..so here it is...Monday, June 4th and I am going for it again! 30 days of no cookies, candy or ice cream (or other desserts...) This isn't NO SUGAR...just these sweet treats that tend to get the best of me :) So here goes it...
Sunday, May 6, 2012
#18....
I am going to TRY and start this one. I have realized I better get going on this list because I have A LOT to do and my time is quickly running out. As I look at my list I realize there are some that may not happen :( But I am going to try my best...here is to working on #18. NOT SWEETS, CANDY, COOKIES etc. for 30 days! Maybe this will help me shed the last 10 or so pounds of my baby weight!
Saturday, February 18, 2012
#3 & #4
Well, this last spring Jer and I needed to make a major decision in our lives...after lots of thought and long conversations, we decided to let our condo go...we were having trouble justifying all of the money getting "dumped" into the HOA association and everything we did/do was on the opposite side of town 30 minutes away. We felt living where we were was going no where fast. With all of the budget cuts and such over the past 5 years in my job, our income was not increasing and the value of our condo was down DRASTICALLY from when we bought it. With the new addition coming soon, we needed to get the process started for our next "move". Luckily Kelly opened her home with open arms and so Jerret proceeded with the mortgage company to get us out of our house fast. And when I say fast...from the first time he contacted them to the last day we were there it was less than 2 weeks...it would have been faster if neither of us worked in the day time and I wasn't pregnant (there was only so much I could help with). We are now in O.C. 5 minutes from Jer's work and about 12 from mine...SOOO nice!!! We are still unsettled here in Kelly's place and taking small steps to get everything organized. I never knew we had so much STUFF until we started removing it from our condo. Let me tell you though... a move makes for great clean out. We have purged SOO Much stuff it feels refreshing. It helps me re-evaluate what we really "need". Most of our stuff is crammed in a storage unit down the road and now that we are unpacking more will be on it's way. It is such a weird feeling packing to temporarily move somewhere because you have to decied "do I need this? or can it go into storage?" Also with new little one almost here, we had to bring a lot of stuff that was "packed" away with us, to get ready for her. We still aren't sure how long we will live with Kelly, but we are keeping our eyes open for a rental house with a reasonable price for our next move. We need somewhere that will be somewhat permanent as our credit is down the tube for the time being and there are certain things we are seeking so we can continue to grow our family. We are so thankful for this decision we made, even though it is weird "intruding" on my sister. (I don't think she feels as though it is an intrusion, but it is weird living in someone else's "space".) I know God has a plan for us, and this is where it has landed us for the time being. I do have to say it will be nice having an extra set of hands when our family turns from 3 to 4...Kelly has already offered babysitting :) Which of course she has because she L.O.V.E.S. babies.


So as for #3 & #4 of my 101 list...they are no longer valid as we can't remodel a kitchen we no longer own and we can't sell a condo we decided to give back...:(

Our empty living room of our first "home that we bought" and Brynn's first home :(

Our empty kitchen

Brynn's very first bedroom
**While clicking through some of the pics of our empty house, I cry because this was "our home" All along while packing I knew I would cry, as I cried the very last night Jer and I left our very 1st apartment together, however, with all the stress this condo brought over the past few months, I didn't cry that last night we walked out...however, sitting here looking through and seeing Brynn's first ever room empty...makes me sad....looking down the hall I will never walk done again...makes me sad....seeing our bedroom I will never sleep in again...makes me sad....knowing Brynn will never get to look out the window at the geese on the pond again..makes me sad....new little addition will never know that house as her home...makes me sad....I know this was the right decision as when we lived there I "hated" it, but it's just the memories that went with it (which I know, they are memories so I will have them in my heart) but it is still difficult.
Subscribe to:
Posts (Atom)